Hyperlinks can be written to allow a viewer of your page to move to some other location.
Images or text can be used to include the hyperlink information.
Several types of locations will be discussed below:
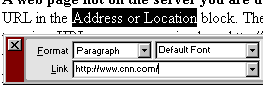
A web page not on the server you are using (an external
page) - Your first step is to visit the page you want to make a hyperlink
to. Click into the URL in the Address or Location block. The URL should highlight.
If it does not, click and drag to highlight the
entire URL. Copy the
URL. Never try to type in a URL, even one as simple as http://www.cnn.con
(did you catch it, all it takes is one keystroke error and your hyperlink
will not work). Go back to the page you are working on in Dreamweaver and
select the object (text or image) which you will use for the hyperlink. With
the text or image selected, paste the URL into the
Link portion of
the properties window, as in the example below:
A specific location on an external page
- A page of Earth Science Internet links has an index at the top of the page.
That index is a set of hyperlinks which point to invisible anchors. Suppose
you were preparing a lesson and wanted to send your students to the part of
the page that has weather links. Don't send them to the top of the page and
trust that they will click on the right part of the index. Select the link
yourself. Notice that the URL now has something added after the file name.
That is the hyperlink to the invisible anchor. For example:
http://www.internet4classrooms.com/earthspace.htm
becomes
http://www.internet4classrooms.com/earthspace.htm#weather
When you find a URL with a link to an anchor, copy the entire
URL and follow the same procedure outlined above.
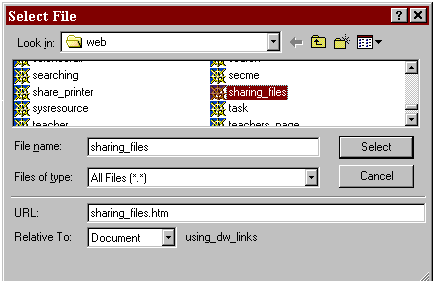
A web page located in your own directory
of pages - To make this hyperlink you do not need the entire URL, only
the file name. From the example above, that would be earthspace.htm. Do not
type this hyperlink in the
Link portion of the properties window. If
you leave off the extension, or include the wrong extension (.html when it
should have been .htm, for example) the link will not work. Dreamweaver has
a simple method for writing this kind of hyperlink. Select the object (text
or image) which you will use for the hyperlink. With the text or image selected,
click on the small folder to the right of the
Link portion of the properties
window.
When you click on the folder, you will be presented with a select
file window. Select the file that you wish to make a hyperlink to.
A specific location on the web page you are
working on - An invisible object in Netscape Composer is called a target.
Personally, I think that is a better name than Dreamweaver's term, anchor.
The same sort of thing in MS Word is called a bookmark. They all do the same
thing, they provide a location for a hyperlink to point to. As an example,
I inserted invisible anchors before each of the bold type lines describing
the type of hyperlink. Then I made hyperlinks of each of the four bulleted
items at the top of the page.
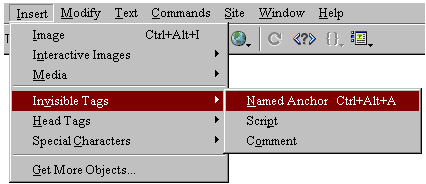
Step 1- Insert the invisible named anchor. Place your cursor where
you want the anchor to be. From the
Insert menu select
Invisible
Tags then select
Named Anchor.
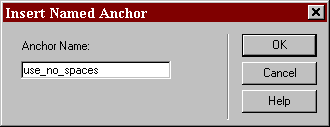
Step 2 - Name the anchor. Although the anchor is invisible, the
name becomes part of the URL. Put some thought into a naming system for
anchors on a page. Since this may become a part of the URL, remember to
use no spaces.
Step 3 - Write the link to your anchor. Select the object (text
or image) which you will use for the hyperlink. With the text or image selected,
type # and the anchor name. Don't put spaces anywhere in the link name,
especially not after the number sign (#).
Select this
link if you want to see what the URL pointing to an anchor looks like.
Using an image as a hyperlink - Look at the bottom of this page.
The word WebGuide is an image, and it is a link to the WebGuide template.
One important consideration is seen in the image below.
If you don't make the image border zero, there will be a box
around the image, indicating that it is a link. If you like the way that
looks, leave the border at 1 or 2.
A blank Email message ready to go to yourself -
If you maintain a web site you will want to make it easy for someone to get
in touch with you. Notice that below this section I have invited readers who
have questions to send Email. Place your cursor on the purple word Email and
you will see how this is done. To make a mail link, highlight the words, or
picture, that you want to serve as a link and in the link portion of the
Properties
window enter:
mailto:you@youraddress.whatever
That is: mailto: followed by your exact email address.
There must be no
spaces. You
can type your email address and then highlight
it and enter the mailto link but that is usually a waste of space. If you
disagree,
send
me Email.
This procedure also works in the body of an Email message. If
you wish the recipient to reply to some other address than the one in the
Reply to: field, write the link the just as you would in the link section
of the Properties window
A new window, leaving the original browser
window open - To leave the original page open and allow a link to open
a second browser window, select _blank in the
Target block of
the
Properties window. If you have Dreamweaver open, look at the
Properties
window. The
Target block should be gray. It does not become
available until you make an entry into the
Link block. Compare
the picture of a Properties window above to your own Properties window.
Changing the color of hyperlinks
- There are two possible answers to this; changing the color of all links
on a page, or changing the color of a specific link.
- To specify the link color for all links on a page go to the Modify
menu and select Page Properties. There you will find the
option to select text color for a page, link color, visited link color,
and active link color. Visited link color takes effect when someone viewing
your page returns to the page after visiting a link. Active link color is
applied as someone clicks on the link to go to another page and when they
return to the page but before they select another link.
- To change the color of one link is another matter. The link you followed
to get to this part of our page has thirteen different colors. Please be
sure that you notice the last word in that link string. That is the real
key to changing link color. Do not change the color of text before writing
the link. Write the link as you normally would, letting the default link
color apply. Beginning with the first letter of the words in your hyperlink,
highlight all but the last letter. Go to the text color box and change the
color of the highlighted text. The link should look something like this;
this is the link.
[Caution, this is not a link it just looks like one.] If you include the
last letter Dreamweaver will not change the link color when your page is
viewed on the web. Next, click into the changed color portion of the link,
just before the last letter and add that letter. It will be the same color
as the rest of the changed hyperlink. It will look like this - this
is the linkk. Now, how do
you get rid of that final letter, which is the default color? That's right,
use your Delete key. This drove me crazy until I learned that trick about
the final letter.
 Select the
Play
button on the bottom right of the
Properties
window and move your cursor over the Flash Text to observe
the color change. When you are finished click the same button, which now
says
Stop
.
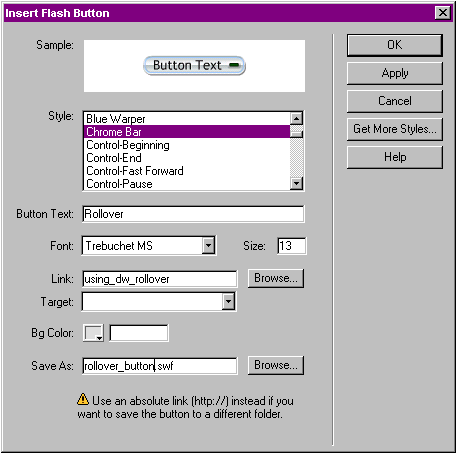
Flash Buttons
Sample buttons available in Dreamweaver
Select the
Play
button on the bottom right of the
Properties
window and move your cursor over the Flash Text to observe
the color change. When you are finished click the same button, which now
says
Stop
.
Flash Buttons
Sample buttons available in Dreamweaver