Untuk mendapatkan ROL asli, sangat tergantung sama keberuntungan.
Syaratnya matahari harus bersinar dengan cerah, dan kabut juga harus
tebal. Saya pernah gagal untuk mendapatkan ROL, walaupun embun tebal,
namun matahari ketutup sama awan.. dasar nasib..Jadi untuk mendapatkan
ROL yang bagus, tidak cukup datang satu kali saja ke satu tempat,
biasanya berkali-kali, atau yang paling gampang, lewat aja tiap hari ,
pasti suatu saat nemu yang paling bagus. Waktu motret biasanya saya
lakukan sejak pukul 7.30 s/d maksimal 8.30 pagi, kadang masih bisa bagus
walaupun sudah jam sembilanan. Saya selalu mengambil dalam format RAW,
biar masih punya banyak celah untuk pengaturan selanjutnya, kalo udah
jago setting di kamera mungkin langsung jpg aja kali yah..he.he. Foto
yang saya jadikan contoh saya ambil dengan exposure 1/160 second dan
Aperture 5.6, dengan exposure compensation saya turunin -2/3. ISO 100,
FL 27mm. (Camera: 400D, Lensa Tamron 18-250). Sudut pengambilan juga
sangat menentukan berhasil tidaknya mendapatkan ROL. Saya biasanya agak
sedikit “menantang” matahari, biar dapatnya lebih seru.
Ini ada beberapa contoh print screen RAW Image, dengan perbedaan exposure:

Gambar 0-a.

Gambar 0-b.

Gambar 0-c.

Gambar 0-d.
Berikut ini contoh RAW image yang akan saya proses selanjutnya.

Gambar 1

Gambar 2
Kemudian dengan RAW Image Task 3.1 bawaan Canon, saya atur Digital
Exposure Compensation diangka +0.4 dan White Balance di 6000K.

Gambar 3
Kemudian WB Shift Sumbu B-A di A1 dan sumbu G-M di G2. Hal ini saya
lakukan dengan tujuan untuk menemukan tone yang saya inginkan. Kembali
ke selera rekan-rekan kalu untuk pilihannya, tergantung selera
masing-masing. Langkah berikutnya, saya Save ke dalam format JPG, agar
diolah bisa diolah lanjutan di PSCS3. Sebagai tambahan info saja (buat
yang belum tahu), PSCS3 bisa untuk melakukan proses RAW ini,
kadang-kadang juga saya pergunakan, tapi untuk kesempatan ini tidak saya
pakai.

Gambar 4

Gambar 5, Detail Setingannya.
Berikutnya, File JPG tersebut saya buka PSCS3.
Copy background image untuk di Filter Highpass dari
Filter>Other>High Pass dengan nilai sekitar 1.6pxl. Kemudian
Blend Mode di set Overlay, yang dimaksudkan untuk melakukan Sharpen
saja. Selain cara ini bisa dilakukan dengan Filter Sharpen, silakan
dipilih. Langkah terakhir, saya atur Brightness/Contras dengan
brightness di +6 dan Contras tetap 0. Selanjutnya, karena biasanya
pengen diupload, saya resize dengan sisi ukuran terbesar ke 900 pxl, dan
kemudian biasanya saya merubah “canvas size” ke 900x900pxl, terus kasih
background Hitam. Untuk ROL aseli hanya sampai di sini saja, dan
fotonya bisa dilihat di sini

Kalo masih berminat, juga masih bisa dilakukan burn and dodge ditempat yang diinginkan.
Kesimpulan dari olahan di atas, sebenarnya yang dilakukan hanya
pengaturan White Balance, Save ke JPG, dan sedikit atur
Brightness/Contras saja. Tidak ada olahan yang luar biasa yang
dilakukan.
B. ROL Palsu (Tambahan)
Bagi yang masih belum puas dengan ROL aselinya, masih bisa ditambahin dengan ROL Palsu kalo mau (bukan aseli dari saya caranya).
Sebagai catatan, ROL tambahan ini akan muncul jika ada backlicght.
Karena gambar ini pada dasarnya sudah memiliki backlight, jadi bisa
langsung diaplikasikan. Jika tidak ada, “terpaksa” harus dibuat
backlight dengan overlay layer baru dengan warna tertentu (misal
Kuning), kemudian Opocity diturunkan, Masalah yang timbul, kita harus
melakukan Musking terhadap POI, dan ini pastinya memerlukan waktu.
Langkah Pertama adalah membuat layer baru, kemudian select kotak
kecil saja, dan Fill 50% gray. Tambahkan noise dari
Filter>noise>add noise, dengan settingan: Amount 400%,
Distribution: Gaussian, Monochromatic di centang.

Gambar 6
Kemudian digedein Kotak kecil tersebut di resize secukupnya.

Gambar 7
Langkah berikutnya, Pilih Filter>Blur>Motion Blur.
Lakukan minimal 2 kali atau sesuai selera dan kebutuhan.

Gambar 8
Kemudian Pilih menu Edit>Transform>Distort, dan atur aja sesuai dengan arah datangnya cahaya.

Gambar 9
Kemudian langkah terakhir, pilih blend modenya di softlight. Dan
jangan lupa untuk melakukan blur dengan filter blur
(Filter>blur>Gaussianblur) agar ROL nya “agak” alami. Untuk
menguatkan ROL nya, bisa dengan menaikkan kontrasnya melalui Menu
“Level” atau “Curve”. Untuk finishing, bisa dilakukan Musking di Bagian
Rumput bawah saja (lihat layer 1 copy, di Gambar 10.)

Gambar 10.
Hasil akhirnya bisa dilihat di Gambar 11

Gambar 11. Perbandingan RAW preview, Pengaturan WB &B/C (Original ROL), Dengan tambahan Artificial ROL
Semoga masih ada manfaatnya.
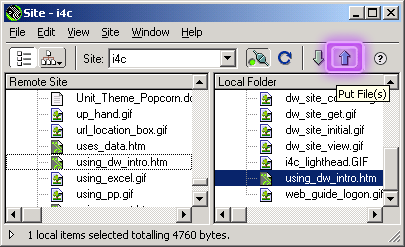
 Select the
Play
button on the bottom right of the
Properties
window and move your cursor over the Flash Text to observe
the color change. When you are finished click the same button, which now
says
Stop
.
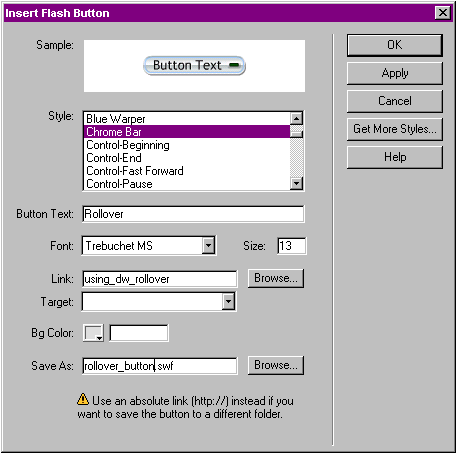
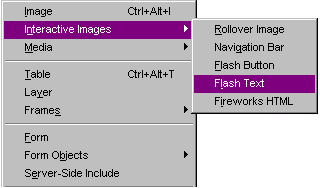
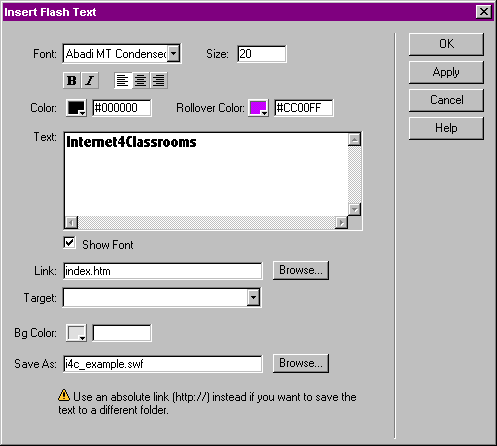
Flash Buttons
Sample buttons available in Dreamweaver
Select the
Play
button on the bottom right of the
Properties
window and move your cursor over the Flash Text to observe
the color change. When you are finished click the same button, which now
says
Stop
.
Flash Buttons
Sample buttons available in Dreamweaver